CFCALENDAR
The <cfcalendar> tag creates a calendar.
In the official example code below you will notice the use of :-
<cfcalendar> , <cfform> and <cfcalendar>.
That's treble trouble! Three lots of bad CFUI code to refactor.
Listing 1 : cfcalendar.cfm
<cfparam name="Form.startdate" default="#dateformat(now()-5, 'dd/mm/yyyy')#">
<cfparam name="Form.enddate" default="#dateformat(now()-1, 'dd/mm/yyyy')#">
<cfparam name="Form.selectdate" default="#dateformat(now(), 'dd/mm/yyyy')#">
<cfif isDefined("Form.submitit")>
    <cfoutput><b>You selected #Form.selectedDate#</b><br><br></cfoutput>
</cfif>
<b>Please select a date on the calendar and click Save.</b><br>
<br>
<cfform name="form1" format="Flash" skin="haloBlue" width="375" height="350" >
    <cfcalendar name="selectedDate"
        selectedDate="#Form.selectdate#"
        startRange="#Form.startdate#"
        endRange="#Form.enddate#"
        mask="mmm dd, yyyy"
        dayNames="SU,MO,TU,WE,TH,FR,SA"
        monthNames="JAN, FEB, MAR, APR, MAY, JUN, JUL, AUG, SEP, OCT, NOV, DEC"
        style="rollOverColor:##FF0000"
        width="200"
        height="150">
    <cfinput type="dateField" name="startdate"  label="Block out starts"  width="100" value="#Form.startdate#">
    <cfinput type="dateField" name="enddate"    label="Block out ends"    width="100" value="#Form.enddate#">
    <cfinput type="dateField" name="selectdate" label="Initial date"      width="100" value="#Form.selectdate#">
    <cfinput type="Submit" name="submitit" value="Save" width="100">
</cfform>
You cannot just change the <cfinput> to be <input>, that just crashes the whole thing.
So cfcalendar> REQUIRES you to use the <cfinput> tag, and deeper down into the rabbit hole you go.
There are may ways to achieve the same thing using a jQuery plugin or even just HTML5.
The following is an HTML5 implementation.
Listing 2 : index.html
<!DOCTYPE html>
<html lang="en">
<head>
    <meta http-equiv="Content-Type" content="text/html; charset=iso-8859-1" />
    <title>Calendar</title>
</head>
<body>
    <div id="wrapper">
        <label for="startDate">Start Date</label>
        <input type="date" name="startDate" id="startDate">
    </div>
</body>
</html>
Well that was easy but it won't work in legacy browsers.
There are loads of jQuery solutions out there, here's an implementation using jQuery and jQuery UI.
Listing 3 : index.cfm
<!DOCTYPE html>
<html lang="en">
<head>
<meta http-equiv="Content-Type" content="text/html; charset=iso-8859-1" />
<title>Calendar</title>
<link rel="stylesheet" href="//code.jquery.com/ui/1.10.4/themes/smoothness/jquery-ui.css">
<link rel="stylesheet" href="css/custom.css">
<script src="http://code.jquery.com/jquery-2.1.0.min.js"></script>
<script src="http://code.jquery.com/ui/1.10.4/jquery-ui.min.js"></script>
<script>
$(function() {
$( "#startDate,#endDate" ).datepicker();
$( ".datePicker" ).datepicker( "option", "dateFormat", "dd/mm/yy" );
});
</script>
</head>
<body>
<div id="wrapper">
<ul id="dates">
<li>Start Date</li>
<li><input type="text" name="startDate" id="startDate" class="datePicker"></li>
<li>End Date</li>
<li><input type="text" name="endDate" id="endDate" class="datePicker"></li>
</ul>
</div>
</body>
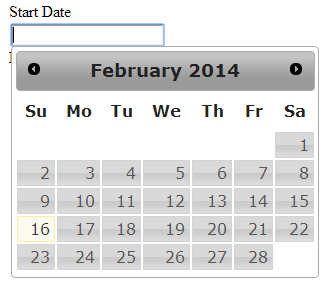
</html>Here we are loading the styles and the jQuery code we need in the <head>.
Then we initialsise the calendars with a bit of jQuery.
Firstly we define that the startDate and endDate are both to be Datepickers :-
$( "#startDate,#endDate" ).datepicker();The startDate and endDate elements both have the same class called datePicker and using this we can specify that both the date elements are to be formatted for UK dates:-
$( ".datePicker" ).datepicker( "option", "dateFormat", "dd/mm/yy" );And when we click in either of the date input boxes we get :-
For further information you can reference :-